Provisioning on Linux
In this Demo, we will
- Using terraform to spin up an Ubuntu host
- Generate an SSH public & private key pair
- Using File Uploads to upload a bash script into the Instance
- Using remote exec to execute the script
Let's create a new folder with some tf files, here I will create a "demo-2" folder for the demo of the Linux host, and another "demo-2b" folder for Windows host later.
Check the files
Under the "demo-2" folder , you will have below files:
instance.tf
resource "aws_key_pair" "mykey" {
  key_name = "mykey"
  public_key = "${file("${var.PATH_TO_PUBLIC_KEY}")}"
}

resource "aws_instance" "example" {
  ami = "${lookup(var.AMIS, var.AWS_REGION)}"
  instance_type = "t2.micro"
  key_name = "${aws_key_pair.mykey.key_name}"

  provisioner "file" {
    source = "script.sh"
    destination = "/tmp/script.sh"
  }
  provisioner "remote-exec" {
    inline = [
      "chmod +x /tmp/script.sh",
      "sudo /tmp/script.sh"
    ]
  }
  connection {
    user = "${var.INSTANCE_USERNAME}"
    private_key = "${file("${var.PATH_TO_PRIVATE_KEY}")}"
  }
}
You can see, here we using the file load to upload a file called "scrpt.sh" to the instance.
Then we will execute it by remote exec. "chmod +x /tmp/script.sh" make this "script.sh" executable and then "sudo /tmp/script.sh" to apply the script.
Also we use connection with SSH key pair "mykey" ssh to the instance to execute the script.
Let's see what is inside the "script.sh":
script.sh
#!/bin/bash
apt-get update
apt-get -y install nginx
It's just a simple bash shell script, which will run "apt-get update" first, then install the nginx with sudo.
provider.tf
provider "aws" {
    access_key = "${var.AWS_ACCESS_KEY}"
    secret_key = "${var.AWS_SECRET_KEY}"
    region = "${var.AWS_REGION}"
}
This file is the exactly the same with the previous demos.
vars.tf
variable "AWS_ACCESS_KEY" {}
variable "AWS_SECRET_KEY" {}
variable "AWS_REGION" {
  default = "us-east-2"
}
variable "AMIS" {
  type = "map"
  default = {
    us-east-1 = "ami-a60c23b0"
    us-east-2 = "ami-ae90b6cb"
    us-west-1 = "ami-96f1dcf6"
    us-west-2 = "ami-7646530f"
  }
}

variable "PATH_TO_PRIVATE_KEY" {
  default = "mykey"
}
variable "PATH_TO_PUBLIC_KEY" {
  default = "mykey.pub"
}
variable "INSTANCE_USERNAME" {
  default = "ubuntu"
}
Here in the "vars.tf". We added 3 more variables.
- "PATH_TO_PRIVATE_KEY", and it's value is "mykey". That means under the same folder with these tf files. we need a ssh private key with the file name "mykey".
- "PATH_TO_PUBLIC_KEY", and it's value is "mykey.pub". That means under the same folder with these tf files. we need a ssh public key with the file name "mykey.pub".
- "INSTANCE_USERNAME", and it's value is "ubuntu". For we're going to spin up an Ubuntu host, as we talked before, the default user of the Ubuntu server is "ubuntu".
Don't forget to create the "terraform.tfvars" and put your "AWS_ACCESS_KEY" and "AWS_SECRET_KEY" inside it.

Next, let's generate the ssh key pair.
Generate SSH Key pair
If you are working on Linux system or Mac, generate the SSHkey pair is easy.
Just run
ssh-keygen -f mykey
and with several enters, you will get have the key pair
~$ sudo ssh-keygen -f mykey
Generating public/private rsa key pair.
Enter passphrase (empty for no passphrase):
Enter same passphrase again:
Your identification has been saved in mykey.
Your public key has been saved in mykey.pub.
The key fingerprint is:
SHA256:k2R6zlrIaefa7TMSxtSSj2g5peLWnEwQkb1K6dR4ylo root@ubuntu-xenial
The key's randomart image is:
+---[RSA 2048]----+
|    .+           |
|    o .          |
|     = .oo       |
|    * ++=..      |
|   = =.BS+       |
|    E.B*=..      |
|   + B=+=.       |
|  . o.=*..o      |
|   .  o.oooo     |
+----[SHA256]-----+

~$ ls
mykey  mykey.pub
Then you can copy and paste them to the folder with the tf files.
If you're working with Windows system, like me using the Windows 10 now, so you cannot use the ssh-kegen, instead we can download and use the puttygen.
You can download the putty and puttygen tools from here. https://www.chiark.greenend.org.uk/~sgtatham/putty/latest.html
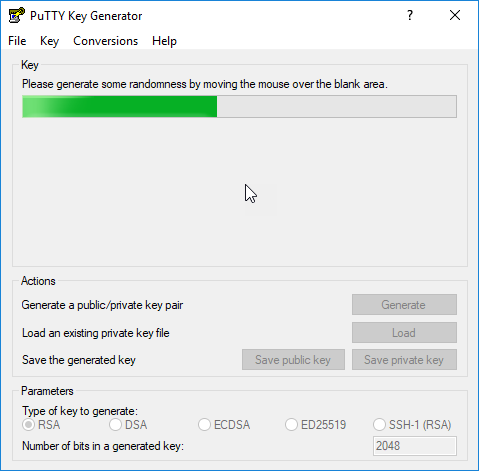
Here is what it looks like. Click "Generate".

Then it will ask to move the mouse in the blank area to generate some randomness.
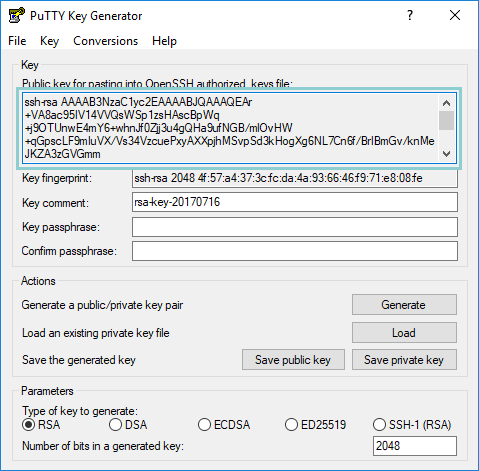
When finished, don't forget to save your key pair to the folder holds your terraform files you're going to use
Make sure you follow the below steps
Please proceed as follows:
- create a local file called
mykey.pubin the project folder. Copy the contents of the field labeled "Public key for pasting into …" into this file. It should be one long line that looks like this:
ssh-rsa AAAAB3NzaC1yc2E...ANqTeH4scPYaQ== rsa-key-20170716
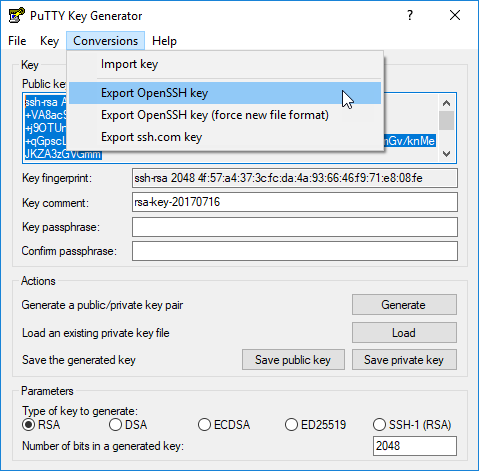
- Choose Conversions ▸Export OpenSSH key to export your private key in the OpenSSH format. Choose
mykeyas the filename and save it the project folder. It should be multiple lines that that looks like this:
-----BEGIN RSA PRIVATE KEY-----
MIIEoQIBAAKCAQEAxet1I80forMqWAj1gCexHQLoikdlMjUl8vM498vdfqrO1dHE
...
ZCRXXL2Q5mlJDSekPLRnrgPervaWBVW8v9Bqgybp9qIigDAQxA==
-----END RSA PRIVATE KEY-----
After these steps, we will see below files in our work folder. Please check if you have same files, if not, you better go back and see what's wrong with your configurations.

Config Security Group for Connection
Looks good. But wait, we're not done yet. For we're going to use ssh to connect to the aws ec2 service, we have to modify the "security group" which is also can be considered as a firewall service of AWS.
We're going to cover the security group with terraform in the later chapters, this time, we're going to config it manually. Later I will tell you how to use terraform to automatically config the security group rules.
Go to http://www.whatsmyip.org/ to find out what is your public IP Address now.
As you can see, my public ip address is "61.221.24.39"

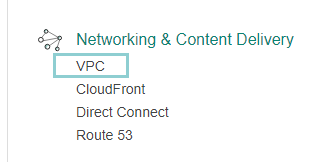
Then , let's login the AWS web console, and in the "Services", let's find the "VPC" service under the "Networking & Content Delivery ".
Although our current region is empty(If you start with an empty region and run the "terraform destroy" every time after you finished your experiment. ), we still see 1 VPC, 3 Subnets and 1 Security Group are already been there.

Click the Security Group.

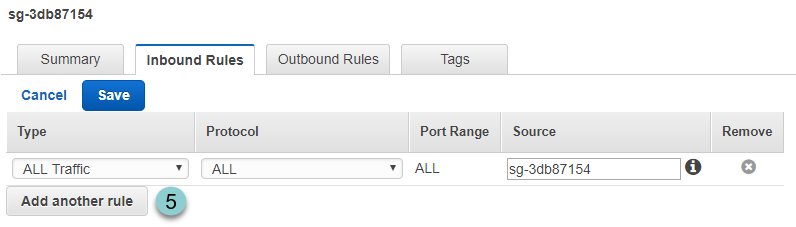
Inside the Security Group dashboard, we will see:
- there is already a security group named "default".
- Select the "default" security group by click the checkbox on the left.
- For we're going to let terraform use ssh connect to the instance from outside, we need to change the Inbound Rules.
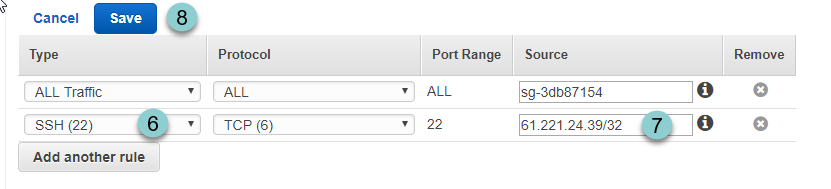
- Click Edit to modify the Inbound Rules.
- Click Add another rule .
- Select SSH(22)
- Enter your public IP Address you got from the http://www.whatsmyip.org/ . For we are going to only allow this one IP to pass the security group, we add cidr "/32" after the IP address.
- Save
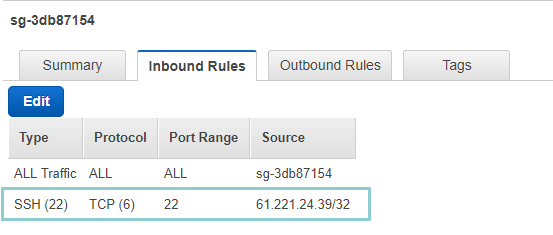
After that, we should see the Inbound Rules has been successfully added.
Let's go back to the project folder and run "terraform apply"
for the output is a little bit long. I'm not going to show you all of them.
aws_key_pair.mykey: Creating...
fingerprint: "" => "<computed>"
key_name: "" => "mykey"
public_key: "" => "ssh-rsa AAAAB3NzaC1yc2EAAAABJQAAAQEAr+VA8ac95IV14VVQsWSp1zsHAscBpWq+j9OTUnwE4mY6+whnJf0Zjj3u4gQHa9ufNGB/mlOvHW+qGpscLF9mIuVX/Vs34VzcuePxyAXXpjhMSvpSd3kHogXg6NL7Cn6f/BrIBmGv/knMeJKZA3zGVG
mm+iZeVXjWDYJVUmxVbqTCHkKSx7fIVjPpaxjruS7T3UsRCt3RUBOGJfIFcwUoF75Vty/nDaI9nhKrP2QgdTxlvKPoxnqd/dxSPS5HgDvYrb5Y47UMH4HlhNEusfmQEiIGhehNNLb46+BzXSDl+rTHq2mvx+5iVR/HgTJy4o49WNjsBELHL/YnfXTiy6Z3cQ== rsa-key-20170
716"
aws_key_pair.mykey: Creation complete (ID: mykey)
aws_instance.example: Creating...
ami: "" => "ami-ae90b6cb"
associate_public_ip_address: "" => "<computed>"
availability_zone: "" => "<computed>"
ebs_block_device.#: "" => "<computed>"
ephemeral_block_device.#: "" => "<computed>"
instance_state: "" => "<computed>"
instance_type: "" => "t2.micro"
.
.
.
aws_instance.example: Provisioning with 'file'...
aws_instance.example: Still creating... (30s elapsed)
.
.
.
aws_instance.example: Provisioning with 'remote-exec'...
aws_instance.example (remote-exec): Connecting to remote host via SSH...
aws_instance.example (remote-exec): Host: 52.15.49.57
aws_instance.example (remote-exec): User: ubuntu
aws_instance.example (remote-exec): Password: false
aws_instance.example (remote-exec): Private key: true
aws_instance.example (remote-exec): SSH Agent: false
aws_instance.example: Still creating... (1m40s elapsed)
aws_instance.example (remote-exec): Connected!
aws_instance.example: Still creating... (1m50s elapsed)
.
.
.
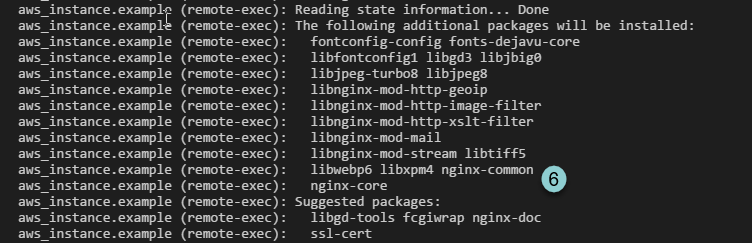
aws_instance.example (remote-exec): The following additional packages will be installed:
aws_instance.example (remote-exec): fontconfig-config fonts-dejavu-core
aws_instance.example (remote-exec): libfontconfig1 libgd3 libjbig0
aws_instance.example (remote-exec): libjpeg-turbo8 libjpeg8
aws_instance.example (remote-exec): libnginx-mod-http-geoip
aws_instance.example (remote-exec): libnginx-mod-http-image-filter
aws_instance.example (remote-exec): libnginx-mod-http-xslt-filter
aws_instance.example (remote-exec): libnginx-mod-mail
aws_instance.example (remote-exec): libnginx-mod-stream libtiff5
aws_instance.example (remote-exec): libwebp6 libxpm4 nginx-common
aws_instance.example (remote-exec): nginx-core
aws_instance.example (remote-exec): Suggested packages:
aws_instance.example (remote-exec): libgd-tools fcgiwrap nginx-doc
aws_instance.example (remote-exec): ssl-cert
.
.
.
aws_instance.example: Creation complete (ID: i-0104191140717abd2)
Apply complete! Resources: 2 added, 0 changed, 0 destroyed.
The state of your infrastructure has been saved to the path
below. This state is required to modify and destroy your
infrastructure, so keep it safe. To inspect the complete state
use the `terraform show` command.
State path:
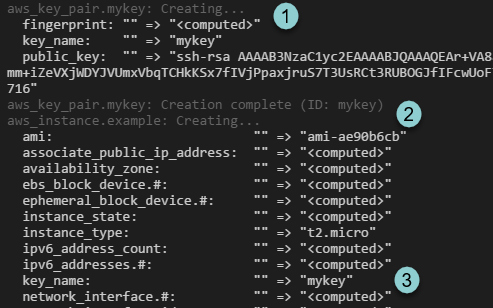


- It created the aws_key_pair.mykey. ID: mykey
- Then it created the instance.
- And set the public key from the "mykey.pub" file.
- Terraform use File upload to upload the "script.sh" into the instance
- After file uploaded. Terraform remote exec the "script.sh". And we can see the instance public ip is "52.15.49.57"
- You can see the nginx is going to be installed.
- Done
That's mean we successfully used terraform to provision software on the AWS linux host.
If you add another Inbound Rule in the "default" security group, like below to allow the HTTP(80) traffic.

You can see the nginx default web page by putting the host public IP in the browser .

Note: Don't forget to run "terraform destroy" after you finished your experiment .