First Steps in Terraform - Spinning up an instance
Create an terraform file:
named "instance.tf"
provider "aws" {
  access_key = "ACCESS_KEY_HERE"
  secret_key = "SECRET_KEY_HERE"
  region     = "us-east-2"
}

resource "aws_instance" "example" {
  ami           = "ami-0d729a60"
  instance_type = "t2.micro"
}
provider : This is the terraform provider, for we are going to create a ec2 instance , it would be aws.
ACCESS_KEY_HERE: Here your put in the "Access key ID" of the "terraform" IAM account from the previous steps.
SECRET_KEY_HERE: Here your put in the "Secret access key" of the "terraform" IAM account from the previous steps.
region : You can chose whatever region you like( might the nearest to your local). Here I chose "us-east-2" Ohio.
example: This is the instance name.
ami: The image id we are using to create our instance. Different OS with different region has different ami. I will show you to how to get the correct ami for your instance later.
instance_type : Choose "t2.micro", so you don't have to pay for them. If for production, You can chose whatever you need.
Edit this file as you need, use whatever editor you feel comfortable , I like using Microsoft Visual Studio Code, it's super powerful, intergrate a nice git function and a intergrated terminal.
Get the AMI
Now we are going to launch a newest version of Ubuntu with a Free tier t2.micro type aws instance.
Let's go to Ubuntu Amazon EC2 AMI Locator, here is the link : http://cloud-images.ubuntu.com/locator/ec2/
In the search box , type "us-east-2" and "zesty"
Tips: "us-east-2" is my aws region, you need change it to the same region in your
instance.tffile."zesty" is the ubuntu 17.04 code name.
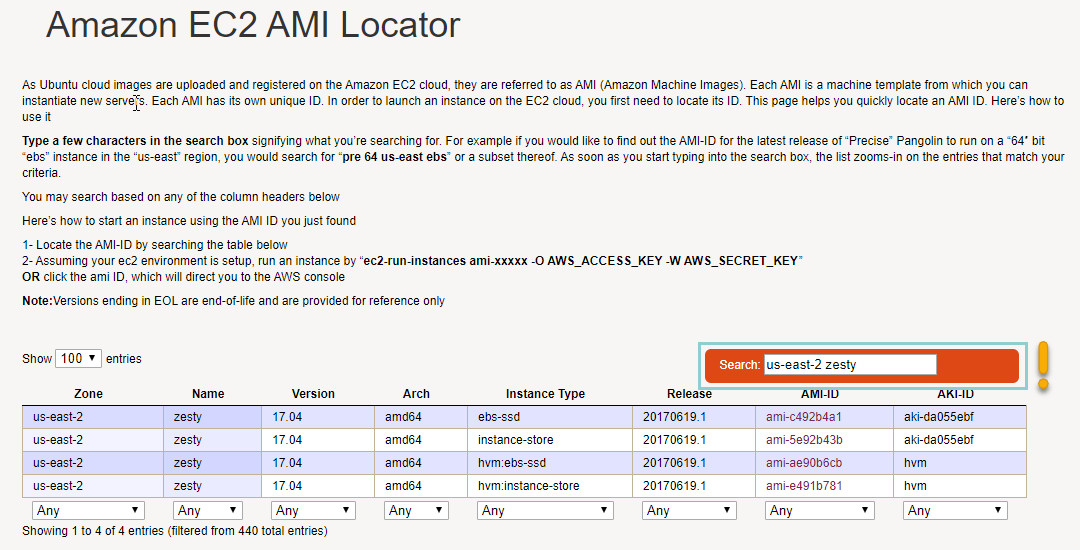 For the Free tier eligible t2.micro type instance only suppor "EBS Only" storage.
We chose "ami-ae90b6cb". You can click the AMI-ID to check if you've made the right choice.

Let 's modify our instance.tf file and insert our "Access key ID", "Secret access key " and "AMI-ID". The final content of the file would be looked like this.

terraform apply
Double check your "instance.tf" file, and make sure everything is under the orders. Then under the same folder/directory, Let's run "terrform apply".
And here is the output:

Check status
Look it was success! Let's go to the "EC2" services to check the status.

We will find an instance and a volume has been up.
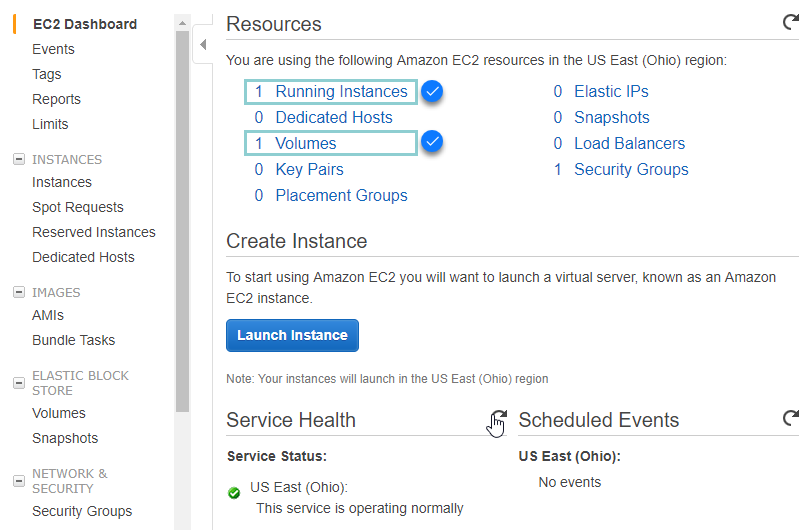
Let's click the "1 Running Instances" and see more :
An instance is running now, its "instance type", "Availability Zone" and "AMI ID" are matching what we described in the "instance.tf" file! Andy the "Instance ID" matches the output of our previous "terrform apply" command.
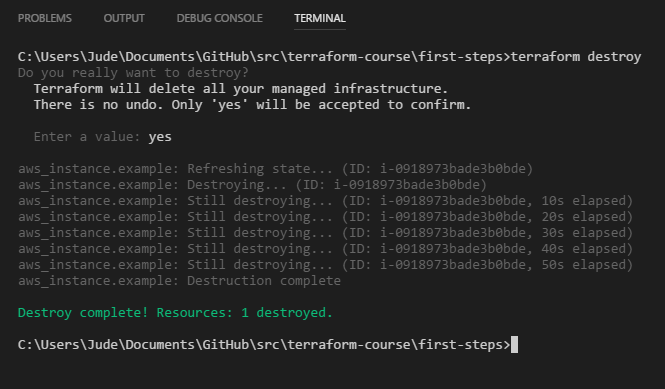
terraform destroy
Then let's destroy it. Just run "terraform destroy" command in the same folder, so you don't have to pay for them.
"terraform destroy " will permanently destroy all the describe in your *.tf files in the running folder, so before you execute the command, please make sure you know what you are doing.
Here is the output:
Let's go to the "EC2" Service to check our current status.
We will see there is no instance left, so the "terraform destroy" works well.
terraform plan
There is another Useful command called "terraform plan". It will look into your *.tf files and show you what it plans to do without applying to your infrastructure.
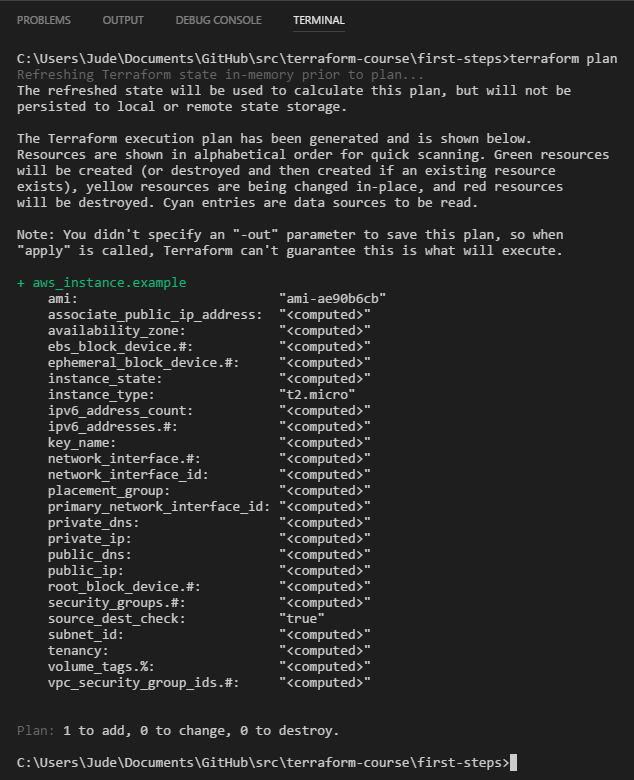
If you use the "-out" argument like "terraform plan -out out.terraform" or any file you like, then the change would been made by the terraform will be saved into that file, let's have a try:

Then you can run "terraform apply out.terraform" to apply the only changes inside the "out.terraform" file.
The "terraform apply" equals to "terraform plan -out file ; terraform apply file ; rm file". It's like a shutcut.
Note: I will use the "
terraform apply" during the demos for it's a quick way to do the job. But please be noted , in the production environment, separate the "terraform plan -out file" and "terraform apply file" would be the better way, it will make you clear what you are planing to do and what you are doing.
Review
Here is the step we make in the previous steps:
- open AWS account
- create IAM admin user
- Create terraform file
- Run terraform apply
- Run
terraform planto test what infrastructure would be built based on your terraform files - then user
terraform applyto execute the changes; - Better way is using "
terraform plan -out filename" argument to keep the changes in an out file - Then only apply those changes to the infrastructure by "
terraform apply filename" - Afterwards the infrastructure can be destroyed by running "
terraform destroy". - Be very careful with "
terraform destroy" command on a production environment!
- Run