Install with Devops-box on Vagrant and VirtualBox
Install Terraform on the windows is not the best choice.
If you can run your pc / laptop on Linux, like Ubuntu, or on MAC, it will be much better than the windows.
But somehow, we can use Vagrant and VirtualBox to spinning up a local vm named "devops-box" on Windows which the terraform, packer, awscli have been already pre-installed.
Okay, let's work on it.
Install VirtualBox
VirtualBox is a powerful x86 and AMD64/Intel64 virtualization product for enterprise as well as home use.
Go to https://www.virtualbox.org/, download and install the Windows hosts Version.
Note: All install steps apply the default option.
Install Vagrant
Vagrant is a tool for building and managing virtual machine environments in a single workflow.
Go to https://www.vagrantup.com/, download and install the Windows Version.
Note: All install steps apply the default option.
Install Git
Go to https://git-scm.com/downloads, download and install the Windows Version.
Note: All install steps apply the default option.

Git Clone Vagrant file
After installing the VirtualBox, Vagrant and git.
Open a Command Prompt by pressing "WIN+R" and run "cmd". Let's say, I want to clone the folder and build the vm under the "C:\".
Change the directory to "C:" and run :
git clone https://github.com/judexzhu/devops-box.git
Here is what it looks like:

Vagrant Up
Bring the devops-box vm up by simply running
vagrant up
It will take some time. After finish, run below command to check the ssh login information
vagrant ssh-config
You will get the information like below: How to login the devops-box:
- Using ip address 127.0.0.1
- SSH port is 2222
- Here is the private-key which used to login the vm
Let's open a ssh termial, I like to use Xshell a lot.
Tips: Xshell can be download from here. https://www.netsarang.com/download/down_xsh5.html
It also has a nice installation guild.
Let's create a new session
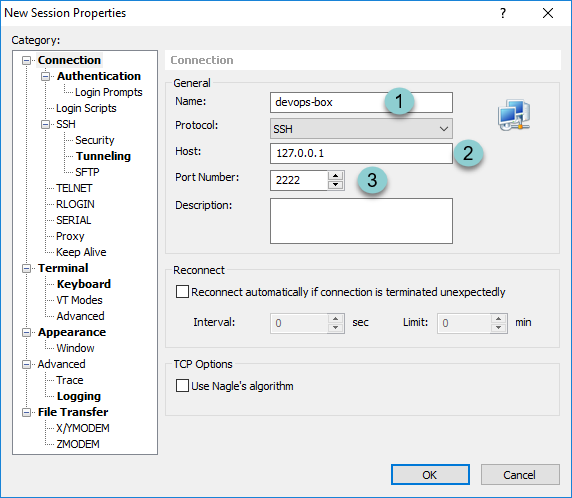
- On connection, give this session a name like "devops-box".
- In the "Host" box fill with "127.0.0.1".
- Set the "Port Number" to "2222".
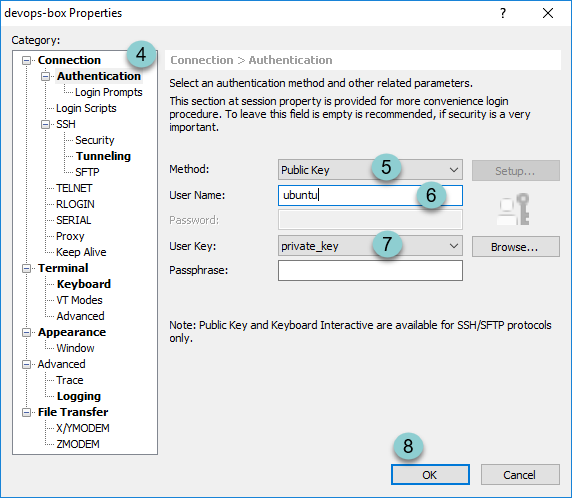
- Go to Authentication.
- Set the "Method:" to "Public Key".
- Set "User Name:" to "ubuntu".
- on the "User Key:", use "Browse.." button on the right to input the private key and select it. Using "
vagrant ssh-config" to get the path of private key. - Click "OK" to finish.
You can see from below image that we can success login the VM, also the "terraform" has already been installed.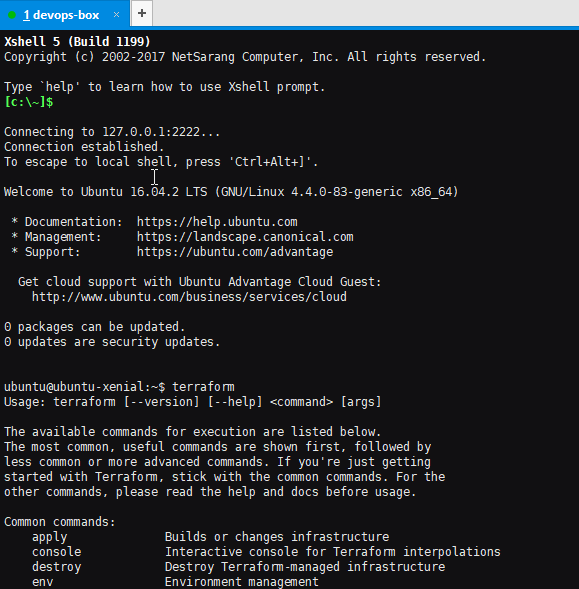
Vargrant Cheat Sheet
Here is some useful command when using vagrant, wish they will be helpful.
Typing `vagrant` from the command line will display a list of all available commands.
Be sure that you are in the same directory as the Vagrantfile when running these commands!
Typing vagrant from the command line will display a list of all available commands.
Be sure that you are in the same directory as the Vagrantfile when running these commands!
Common Vagrant Commands
vagrant up-- starts vagrant environment (also provisions only on the FIRST vagrant up)vagrant status-- outputs status of the vagrant machinevagrant halt-- stops the vagrant machinevagrant reload-- restarts vagrant machine, loads new Vagrantfile configurationvagrant provision-- forces reprovisioning of the vagrant machinevagrant ssh-- connects to machine via SSHvagrant destroy-- stops and deletes all traces of the vagrant machine
Tips
vagrant -v-- Get the vagrant versionvagrant global-status-- outputs status of all vagrant machinesvagrant global-status --prune-- same as above, but prunes invalid entriesvagrant suspend-- Suspends a virtual machine (remembers state)vagrant resume-- Resume a suspended machine (vagrant up works just fine for this as well)vagrant reload --provision-- Restart the virtual machine and force provisioningvagrant provision --debug-- Use the debug flag to increase the verbosity of the outputvagrant push-- Yes, vagrant can be configured to deploy code!vagrant up --provision | tee provision.log-- Runsvagrant up, forces provisioning and logs all output to a file
Notes
- If you are using VVV, you can enable xdebug by running
vagrant sshand thenxdebug_onfrom the virtual machine's CLI.